
Perl modules are considered to be one of the strongest points for perl's success. They contain a lot of re-usable code and of course are free. This is an attempt to trap the treasure trove. There are lot of tutorials and even books written on popular modules like CGI, DBI etc.. For less popular modules, users are left with documentation which is cryptic and sometimes incomplete.
I am starting a series of articles that will attempt to explain some of the less popular but useful modules. During the last year, I came across and programmed with numerous perl modules. I will explain the modules with numerous useful examples from my experience. We will take one module at a time and explore its various uses.
Well, you should know perl. We won't be delving much into the basics of perl. There are plenty of documentation, articles and books on perl. Learning Perl is often recommended for beginners. Once you gain experience, you can try Programming Perl.
If you are an average perl programmer and haven't used lot of modules, this is the right place. Modules provide a great way to re-use code and write efficient and compact applications. In each article we will graduate from simple examples to complex examples ending in a real-world application, if appropriate.
use module;
For example if you want to use GD, you would write
use GD;
Before we plunge into the details of programming, here are some instructions for finding and installing modules. We will be using various modules, and most of them are not installed by default. Some modules require libraries which may or may not have been installed. I will mention the things required whenever appropriate. Here are generic instructions for downloading and installing modules.
An easy way to install the module is by using the CPAN module. Run CPAN in interactive mode as
perl -MCPAN -e shell
Then you can do various tasks like downloading, decompressing and installing modules. For example, for installing GD you can use
install GD
If you are like me and and are accustomed to configure, make, make install method, here are the steps to install a module.
tar zxvf GD-1.40.tar.gz
    perl Makefile.PL
        (or)
    perl Makefile.PL PREFIX=/my/perl/directory
        (if you want to install in /my/perl/directory)
    make
    make test (optional)
make install
So you have installed your favourite module and are raring to learn. In this article we will explore the perl GD module, which provides an interface to GD library. We will also be using the CGI module for the web interface. You don't need to know a great deal of CGI to understand this article. I will explain things where necessary.
Let's start the wheels with a simple and effective example
Text version of the file can be found here.
#!/usr/local/bin/perl -w
# Change above line to path to your perl binary

use GD;

# Create a new image
$im = new GD::Image(100,100);

# Allocate some colors
$white = $im->colorAllocate(255,255,255);
$black = $im->colorAllocate(0,0,0);
$red = $im->colorAllocate(255,0,0);
$blue = $im->colorAllocate(0,0,255);

# Make the background transparent and interlaced
$im->transparent($white);
$im->interlaced('true');

# Put a black frame around the picture
$im->rectangle(0,0,99,99,$black);

# Draw a blue oval
$im->arc(50,50,95,75,0,360,$blue);

# And fill it with red
$im->fill(50,50,$red);

# Open a file for writing
open(PICTURE, ">picture.png") or die("Cannot open file for writing");

# Make sure we are writing to a binary stream
binmode PICTURE;

# Convert the image to PNG and print it to the file PICTURE
print PICTURE $im->png;
close PICTURE;
This is the example given in the GD man page with little modifications. This produces a small rectangle with a red oval with blue border. Let's dissect the program.
One of the first things you do with GD library, is create an image handle to work with. The line
$im = new GD::Image($width, $height)
creates and image with the specified width and height. You can also create an image from an existing image as well. It is useful for manipulating existing images. We will see an example on this in the later part of the article.
Next we need to allocate some colors. As you can guess, the RGB intensities need to be specified for initializing colors. Since we will be using lots of colors, let's write a small function which will initialize a bunch of colors for use.
Text version of the file can be found here.
# Save this as init_colors.pl
# Other scripts call this function

sub InitColors {
    my($im) = $_[0];
    # Allocate colors
    $white = $im->colorAllocate(255,255,255);
    $black = $im->colorAllocate(0,0,0);
    $red = $im->colorAllocate(255,0,0);
    $blue = $im->colorAllocate(0,0,255);
    $green = $im->colorAllocate(0, 255, 0);

    $brown = $im->colorAllocate(255, 0x99, 0);
    $violet = $im->colorAllocate(255, 0, 255);
    $yellow = $im->colorAllocate(255, 255, 0);
}
I often refer to this page for some nice rgb combinations.
The next few lines are straightforward and pretty much self-explanatory. The last lines regarding the file creation require special mention. Since we will be writing an image to a file, we need to put the file handle in binary mode with
binmode MYFILEHANDLE;
This actually is a no-op on most UNIX-like systems.
Then we write to the file with the usual print command. GD can print the image in various formats. For example if you want to print a jpeg image instead of png, all you need to do is
print MYFILEHANDLE $im->jpeg;
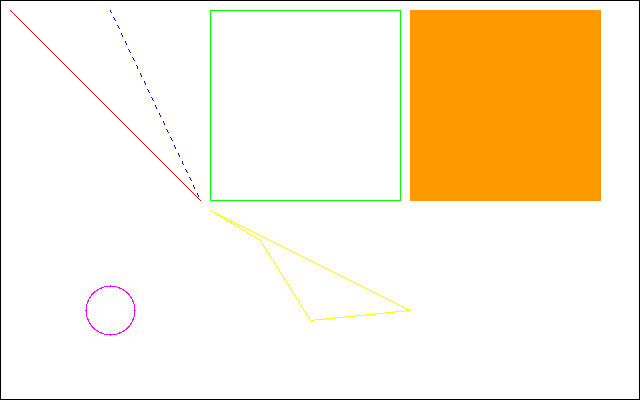
GD offers some simple drawing primitives which can be combined to generate complex graphics. Examine the following script that gives a whirlwind tour of all the simple primitives.
Text version of the file can be found here.
#!/usr/local/bin/perl
# Change above line to path to your perl binary

use GD;
do "init_colors.pl";

# Create a new image
$im = new GD::Image(640,400);

# Allocate some colors
&InitColors($im);

# Make the background transparent and interlaced
$im->transparent($white);
$im->interlaced('true');

$x1 = 10;
$y1 = 10;
$x2 = 200;
$y2 = 200;

# Draw a border
$im->rectangle(0, 0, 639, 399, $black);
# A line
$im->line($x1,$y1,$x2,$y2,$red);
# A Dashed Line
$im->dashedLine($x1 + 100, $y1, $x2, $y2, $blue);
# Draw a rectangle
$im->rectangle($x1 + 200, $y1, $x2 + 200, $y2, $green);
# A filled rectangle
$im->filledRectangle($x1 + 400, $y1, $x2 + 400, $y2, $brown);
# A circle
$im->arc($x1 + 100, $y1 + 200 + 100, 50, 50, 0, 360, $violet);

# A polygon
# Make the polygon
$poly = new GD::Polygon;
$poly->addPt($x1 + 200, $y1 + 200);
$poly->addPt($x1 + 250, $y1 + 230);
$poly->addPt($x1 + 300, $y1 + 310);
$poly->addPt($x1 + 400, $y1 + 300);
# Draw it
$im->polygon($poly, $yellow);

# Open a file for writing
open(PICTURE, ">picture.png") or die("Cannot open file for writing");

# Make sure we are writing to a binary stream
binmode PICTURE;

# Convert the image to PNG and print it to the file PICTURE
print PICTURE $im->png;
close PICTURE;
The output looks like this.
The above script is self-explanatory. The polygon needs a little bit of explanation. In order to draw a polygon, you first have to make the polygon and then draw it. Of course, a polygon must have at least three vertices.
So what about text? You can draw text in some of the simple fonts provided by GD or use a True Type font available on your system. There are two simple functions available to draw text.
    # Draw the text
    $im->string($font, $x, $y, $string, $color);

    # Print text rotated 90 degrees
    $im->stringUp($font, $x, $y, $string, $color);
The following script shows various simple fonts provided by GD.
Text version of the file can be found here.
#!/usr/local/bin/perl
# Change above line to path to your perl binary

use GD;
do "init_colors.pl";

# Create a new image
$im = new GD::Image(200, 80);

# Allocate some colors
&InitColors($im);

# Make the background transparent and interlaced
$im->transparent($white);
$im->interlaced('true');

# Create a Border around the image
$im->rectangle(0, 0, 199, 79, $black);
$x1 = 2;
$y1 = 2;

# Draw text in small font
$im->string(gdSmallFont, $x1, $y1, "Small font", $blue);
$im->string(gdMediumBoldFont, $x1, $y1 + 20, "Medium Bold Font", $green);
$im->string(gdLargeFont, $x1, $y1 + 40, "Large font", $red);
$im->string(gdGiantFont, $x1, $y1 + 60, "Giant font", $black);

# Open a file for writing
open(PICTURE, ">picture.png") or die("Cannot open file for writing");

# Make sure we are writing to a binary stream
binmode PICTURE;

# Convert the image to PNG and print it to the file PICTURE
print PICTURE $im->png;
close PICTURE;
The output picture looks like this.
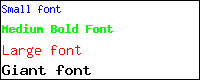
As you can see, these fonts are quite limited and not so attractive. The following section shows the usage of True Type Fonts with GD
You can use the true type fonts available on your system to draw some nice
text. The function stringFT is used to draw in TTF font.
    # $fontname is an absolute or relative path to a TrueType font.
    stringFT($fgcolor,$fgcolor,$fontname,$ptsize,$angle,$x,$y,$string);
Here's an example showing the usage
Text version of the file can be found here.
#!/usr/local/bin/perl
# Change above line to path to your perl binary

use GD;
do "init_colors.pl";

# Create a new image
$im = new GD::Image(270, 80);

# Allocate some colors
&InitColors($im);

# Make the background transparent and interlaced
$im->transparent($white);
$im->interlaced('true');

$im->rectangle(0, 0, 269, 79, $black);

$x1 = 10;
$y1 = 20;

# Draw text in a TTF font
$font = "/usr/X11R6/lib/X11/fonts/TTF/luxisri.ttf";
$im->stringFT($red, $font, 15, 0, $x1, $y1, "A TTF font");

$anotherfont = "/usr/share/fonts/default/TrueType/starbats.ttf";
$im->stringFT($blue, $font, 20, 0, $x1, $y1 + 40, "Another one here !!!");

# Open a file for writing
open(PICTURE, ">picture.png") or die("Cannot open file for writing");

# Make sure we are writing to a binary stream
binmode PICTURE;

# Convert the image to PNG and print it to the file PICTURE
print PICTURE $im->png;
close PICTURE;
The output looks like this.

Now that we have seen some basic uses of GD, let's turn our attention to web graphics. So how do you output an image through CGI? Simple. Add the following lines to the scripts instead of printing to a file.
    # To disable buffering of image content.
    select(STDOUT);
    $| = 1;
    undef $/;

    print "Content-type: image/jpeg\n\n";
    print $im->jpeg(100);
This is all you need to know about CGI for now. If you already know CGI, you can enhance your code for handling complex web interaction. Let's write a small program which reads an image and displays a resized version of it. It might be useful for showing thumbnails.
Text version of the file can be found here.
#!/usr/local/bin/perl -wT
# Change above line to path to your perl binary

use CGI ':standard';
use GD;

# create a new image
$image_file = "images/surfing.jpg";
$im = GD::Image->newFromJpeg($image_file);
($width, $height) = $im->getBounds();
$newwidth = $width / 3;
$newheight = $height / 3;
$outim = new GD::Image($newwidth, $newheight);

# make the background transparent and interlaced
$outim->copyResized($im, 0, 0, 0, 0, $newwidth, $newheight, $width, $height);

# make sure we are writing to a binary stream
binmode STDOUT;
select(STDOUT);
$| = 1;
undef $/;
print "Content-type: image/jpeg\n\n";
print $outim->jpeg();
In this example, the function newFromJpeg() reads a jpeg file. Then we then calculated the boundaries and resized it accordingly. A demo of the resizing can be found here
With this resizing knowledge we can create a small online photo album. In this we use resizing to show smaller images and display the original image when the user clicks on the smaller images.
Text version of the file can be found here.
#!/usr/local/bin/perl -wT
# Change above line to path to your perl binary

use CGI ':standard';
use GD;

$imnum = param('imnum');
if(!defined($imnum)) {
    $imnum = 0;
}

$orig = param('orig');
if(!defined($imnum)) {
    $orig = 0;
}

select(STDOUT);
$| = 1;

@images = ("surfing.jpg", "boat.jpg", "boston-view.jpg", "seashore.jpg");

print "Content-type: text/html\n\n";
print "<font color=green>Click on the image to make it bigger or smaller<br>
You can browse through the small images using the buttons or by clicking
on the numbers </font>\n";
print "<table><tr>\n";

if($imnum > 0 && $imnum < @images) {
    printf "<td><a href=album.cgi?imnum=%d><img src=images/prev.gif border=0></a>\n", $imnum-1;
}

if($imnum >= 0 && $imnum < @images - 1) {
    printf "<td><a href=album.cgi?imnum=%d><img src=images/next.gif border=0></a>\n", $imnum+1;
}

print "<td>";
for($i = 0; $i < @images; ++$i) {
    print "<a href=album.cgi?imnum=$i>$i|</a>\n";
}
print "</tr></table>\n";
if($imnum < 0 || $imnum >= @images) {
    print "<b>No such image</b>";
    exit;
}

if($orig) {
    print "<a href=album.cgi?imnum=$imnum><img src=images/$images[$imnum] border=0></img></a>\n";
}
else {
    $im = GD::Image->newFromJpeg("images/$images[$imnum]");
    # create a new image
    ($width, $height) = $im->getBounds();
    $newwidth = 200;
    $newheight = 200;
    $outim = new GD::Image($newwidth, $newheight);

    $outim->copyResized($im, 0, 0, 0, 0, $newwidth, $newheight, $width, $height);
    $tmpfile = "images/tmp$imnum.jpg";
    if ($tmpfile =~ /^([-\@\w.\/]+)$/) {   # For the tainting stuff
        $tmpfile = $1;
    }
    else {
        print "Should never happen";
        exit; # Should never happen
    }
    open(TMP, ">$tmpfile") || die("Cannot open file");
    binmode(TMP);
    print TMP $outim->jpeg(100);
    close(TMP);
    chmod(0644, $tmpfile);
    print "<a href=album.cgi?imnum=$imnum&orig=1><img src=$tmpfile border=0></a>";
}
This script uses a few CGI features. The function param returns the parameter value, if supplied. This value is used to display the proper image. If the user wants to see an original image, it is displayed. Otherwise a temporary resized image is created and displayed.
Now let us turn our attention to another popular web application "A Hit Counter". There are many counter scripts available on web. Here's our attempt to write one.
The counter works like this. Every time a web-page is accessed, the cgi script records the hit count and creates an image on-the-fly. So why wait? Let's write it.
Text version of the file can be found here.
#!/usr/local/bin/perl -wT
use CGI ':standard';
use GD;
use strict;

my($LOCK_SH, $LOCK_EX, $LOCK_NB, $LOCK_UN);

$LOCK_SH = 1;
$LOCK_EX = 2;
$LOCK_NB = 4;
$LOCK_UN = 8;

select(STDOUT);
$| = 1;

&main;

sub main {
    my($id, $iformat, $show);

    $id = param("id");
    $iformat = param("iformat");

    my($counter_value);
    $counter_value = &update_counter_value($id);

    chomp($counter_value);
    if($iformat eq "jpg" || $iformat eq "png") {
        &print_counter($iformat, $counter_value);
    }
    else {
        &print_error_image("Image format $iformat not supported");
    }
}

sub print_counter {
    my($iformat, $counter_value) = @_;
    my($COUNTER_SIZE) = 4;

    my($im) = GD::Image->new("${iformat}s/0.${iformat}");
    if(!defined($im)) {
        &print_error_image("\$im couldn't be initialized");
        exit;
    }

    my($w, $h) = $im->getBounds();
    undef $im;

    my($printim) = GD::Image->new($w * $COUNTER_SIZE, $h);
    $printim->colorAllocate(255, 255, 255);

    my($pos, $l, $temp, $digit, $x, $srcim);
    $x = 0;
    for($pos = $COUNTER_SIZE - 1; $pos >= 0; $pos--) {
        if($pos > length($counter_value) - 1) {
            $digit = 0;
        }
        else {
            $l = length($counter_value);
            $temp = $l - $pos - 1;
            $digit = substr($counter_value, $temp, 1);
        }
        $srcim = GD::Image->new("${iformat}s/${digit}.${iformat}");
        $printim->copy($srcim, $x, 0, 0, 0, $w, $h);
        $x += $w;
        undef $srcim;
    }
    if($iformat eq "jpg") {
        print "Content-type: image/jpeg\n\n";
        print $printim->jpeg(100);
    }
    else {
        print "Content-type: image/png\n\n";
        print $printim->png;
    }
}

sub print_error_image {

    my $error_string = $_[0];
    my $im = new GD::Image(
    gdMediumBoldFont->width * length($error_string),
    gdMediumBoldFont->height);

    $im->colorAllocate(255, 255, 255);
    my $red = $im->colorAllocate(255, 0, 0);
    $im->string(gdMediumBoldFont, 0, 0, $error_string, $red);
    print "Content-type: image/jpeg\n\n";
    print $im->jpeg(100);
    exit;
}

sub update_counter_value {
    my($file_name, $counter_value);

    $file_name = "$_[0].counter";
    if ($file_name =~ /^([-\@\w.]+)$/) {   # For the tainting stuff
        $file_name = $1;
    }
    else {
        exit; # Should never happen
    }
    if(open(COUNTERFILE, "+<$file_name") == 0) {
        # Getting accessed for the first time
        open(COUNTERFILE, ">$file_name");
        print COUNTERFILE "1";
        close(COUNTERFILE);
        return 1;
    }

    flock(COUNTERFILE, $LOCK_EX);
    $counter_value = <COUNTERFILE>;
    seek(COUNTERFILE, 0, 0);
    ++$counter_value;
    print COUNTERFILE $counter_value;
    flock(COUNTERFILE, $LOCK_UN);

    close(COUNTERFILE);
    return($counter_value - 1);
}
This script can be used by adding a line like this in your web page.
<img src=counter.cgi?id=my_html_file.html&iformat=jpg>
The id needs to be unique. A sample counter can be seen on my home page.
Now to the innards of the script. The counter script has three important functions.
update_counter_value: This function reads the hit count from a file named
                      html_file.counter and increments it. It creates the
                      counter file, if one already doesn't exist. It also
                      locks the file to avoid conflicts due to multiple
                      simultaneous accesses.

print_counter:        Prints the counter by attaching the counter digits in a new
                      image. The digits are read from an appropriate directory.

print_error_image:    This is a useful function to show error images. You
                      can use it in your programs, for reporting errors
                      through GD.
You need to have the digits (0-9) in jpg or png format. Sites like Counter Art dot Com provide free counter digits. In my next article, I'll discuss how to generate digits on the fly.
I developed a personal website statistics package woven around this counter concept. It provides much more than a simple counter. It logs the accesses, shows visitor statistics and much more. Check it out at pstats page.
You can also use the File::CounterFile module for managing the counter file.
I hope you enjoyed reading this article. In the coming months, we will look at GD::Graph and PerlMagick modules. Send me comments at this address.
Have Fun !!!
My best friend ravi has become the official editor for all my writings. I am indebted to him for looking through all the gibberish I write and make sense out of it. Thanks ravi :-)
I thank Benjamin A. Okopnik for
reviewing the article and pointing out some nice perl hacks.
I am a master's student at University of Florida. I love hacking and
adore Linux. My interests include solving puzzles and playing board
games. I can be reached through
p_padala@yahoo.com or my web site.
 Pradeep Padala
Copyright © 2002, Pradeep Padala.
Copying license http://www.linuxgazette.com/copying.html
Published in Issue 81 of Linux Gazette, August 2002![]()
![]()
![]()
![]()
![]()
![]()
![]()
![]()