Libdc1394 Library Support for IEEE 1394 Cameras HOWTO
Rohit Agarwal
Vikram B
2006-01-23
| Revision History | ||
|---|---|---|
| Revision 1.2 | 2007-04-14 | Revised by: RA |
| Addition of DMA related section contributed by Ian Peikon <idp2@duke.edu>and Tim Hanson <tim@hardcarve.com> | ||
| Revision 1.0 | 2006-01-23 | Revised by: TMM |
| Initial release, reviewed by TLDP | ||
| Revision 0.4 | 2005-12-18 | Revised by: TMM |
| Correction of markup | ||
| Revision 0.3 | 2005-11-27 | Revised by: TMM |
| Conversion to DocBook XML | ||
| Revision 0.2 | 2005-10-15 | Revised by: VB |
| Minor fixes. | ||
| Revision 0.1 | 2005-10-10 | Revised by: RA & VB |
| Initial draft. | ||
- Table of Contents
- 1. Introduction
- 2. Requirements
- 3. Installation
- 4. Concepts and Basic Programs
- 4.1. Important Data Structures
- 4.2. Types of functions
- 4.3. Coriander: A GUI for the libdc1394 library
- 4.4. Example: How to grab image from the IEEE1394 camera
- 4.5. Example: How to grab image from the IEEE1394 camera using DMA
- 4.6. How to get color images: Bayer Pattern Concepts
- 4.7. Common Problems Faced While Working With IEEE1394 Cameras
- 5. References
- A. Appendix A
- A.1. License
- A.2. Disclaimer
- A.3. About Authors
- A.4. Dedications
1. Introduction
We felt a HOWTO on this topic was required since very little documentation is available for the libdc1394 library. Moreover, the IEEE1394 cameras are gaining popularity, which will lead to many people using this library to develop applications for cameras on Linux. This HOWTO is an outcome of our experience working with the Point Grey Dragonfly IEEE1394 camera on Linux.
We have given the overview of the library in layman's terms, so anybody who has some programming experience will easily understand the contents.
2. Requirements
Various libraries and modules required are:
Library: libdc1394-1.1.0
Supporting Library: libraw1394-1.2.0
Supporting Modules: ieee1394, raw1394, ohci1394, video1394
Linux Kernel: 2.6.10 or above
3. Installation
Prerequisite: Make sure that the kernel is compiled with IEEE1394 built-in support. This is critical!
You can add support for the IEEE1394 devices by compiling the kernel again. Don't panic! Here are the steps to compile the kernel:
Go to the directory where your kernel source code is present. Normally it is in /usr/src. We suggest that you download a fresh copy of the kernel source code (2.6.10) from www.kernel.org.
Thus, cd /usr/src/kernel-2.6.10 (kernel-2.6.10 is the name of the source code directory. It can vary from system to system.)
make menuconfig
The menu will come up. Select
The menu will come up. Select
Mark the following as <M> in the menu that is shown:
OHCI-1394 support
OHCI-1394 Video Support
OHCI-1394 DVI/O Support
RAW IEEE1394 I/O Support
Press ESC to come out of the menu
Save the configuration
Install libraw1394-1.2.0
su root
tar -xvzf libraw1394-1.2.0.tar.gz
cd libraw1394-1.2.0
./configure
make
make install
Install libdc1394-1.1.0
su root (if you haven't already)
tar -xvzf libdc1394-1.1.0.tar.gz
cd libdc1394-1.1.0
./configure
cd libdc1394
make
make install
Install the modules
modprobe ohci1394
modprobe video 1394
modprobe ieee1394
modprobe raw1394
lsmod to view that all the modules (ieee1394, raw1394, ohci1394 and video1394) are now installed.
 | Note on dependencies: |
|---|---|
The modules have some dependencies:
|
Create proper 1394 devices
cd /dev
mknod raw1394 c 171 0
chmod 666 /dev/raw1394
mkdir video1394
cd video1394
mknod 0 c 171 16
mknod 1 c 171 17
chmod 666 /dev/video1394/*
| Note on automating module start-up: |
|---|---|
Every time the system is restarted, the nodes are destroyed and the modules are removed automatically. So we wrote a script to automate this installation task at start-up, to undo all the damage done during rebooting! |
Set user paths
su user
Check for the LD_LIBRARY_PATH. It should contain /usr/local/lib. This is necessary to run the applications with the help of the shared libdc1394_cotrol.so.13 object file.
| Note on setting path: |
|---|---|
You can also set the path by adding /usr/local/lib in /etc/ld.so.conf. |
This completes the installation phase.
In order to make sure the installation is correct, connect the camera to the IEEE1394 card (assuming that the IEEE1394 card is already installed on the system) and just run testlibraw:
$ testlibraw
This tests for the presence of the host card, camera and other related parameters. Below is a typical output from testlibraw:
Successfully got handle current generation number: 17 1 card(s) found nodes on bus: 2, card name: ohci1394 using first card found: 2 nodes on bus, local ID is 0, IRM is 1 doing transactions with custom tag handler trying to send read request to node 0... completed with value 0x23127bac trying to send read request to node 1... completed with value 0x60217dac using standard tag handler and synchronous calls trying to read from node 0... completed with value 0x04477dac trying to read from node 1... completed with value 0xd37380ac testing FCP monitoring on local node got fcp command from node 0 of 8 bytes: 01 23 45 67 89 ab cd ef got fcp response from node 0 of 8 bytes: 01 23 45 67 89 ab cd ef polling for leftover messages |
The libdc1394-1.1.0 library comes with some example programs which are very helpful in understanding how the programs are to be written. There is a Makefile available in the examples folder of the tar file. To compile and execute the programs:
cd libdc1394-1.1.0/examples
make
You can get programs exclusively written for the Point Grey cameras at http://www.ptgrey.com/support/kb/data/grabdma.tgz.
Fortunately, we have an open source graphical application developed for the IEEE1394 cameras, known as Coriander that provides a nice Graphical User Interface for libdc1394 to help the user work with the camera more efficiently. Later we will discuss how Coriander helped us in debugging. Next, we briefly explain how to install Coriander.
Installation of Coriander
Make sure that you have libdc1394 and the Gnome libraries (Coriander uses gnome.h) installed on your Linux machine. For more details regarding the requirements, look into the user manual provided by Coriander: http://damien.douxchamps.net/ieee1394/coriander/manual.php.
Download the following tar file from sourceforge.net: coriander-1.0.1.tar.gz, then proceed as shown below:
su root
tar -xvzf coriander-1.0.1.tar.gz
cd coriander-1.0.1
./configure
cd src
make
make install
Run Coriander as follows:
cd coriander-1.0.1/coriander-1.0.1/src
./coriander
Fortunately, the installation of the libdc1394 and related modules is simple and does not pose any major problems. Some minor problems you may face are due to mistakes such as not installing it as root or not changing the permissions of the newly created IEEE1394 devices.
4. Concepts and Basic Programs
At present, the documents that are available for understanding libdc1394 are very few. Among the available documents are a FAQ, which only talks about the general concept of the camera and a few forums where people have posted their queries.
We had to read the libdc1394 source code to understand how to grab a frame from the camera. The extreme need for a complete explanation on this topic encouraged us to write this HOWTO.
On the basis of what we understood by exploring the source code of the camera, we are presenting our insights on the library.
We encourage you to keep referring following files while reading through the next section:
dc1394_control.h
dc1394_control.c
dc1394_capture.c
dc1394_format7.c
The dc1394_control.h file is the most important, as it contains the declaration of various functions and data structures. It should be read to understand the features supported by IEEE1394 cameras and the functions which access and control various features of camera.
The dc1394 library works closely with raw1394 since all the functions make use of functions of raw1394 (raw1394_read() and raw1394_write()) in order to retrieve or modify the values of various parameters of the camera. This is one of the reasons why raw1394 must be installed before installing libdc1394.
To understand how the functions provided by the library work, we need to understand few technical aspects of the IEEE1394 camera:
There can be more than one camera connected to the host card at any time, hence one need to uniquely identify the camera node.
The camera has some control registers to set camera features.
According to IEEE specifications, the camera can grab images in different formats. The image formats are defined by two parameters: format and mode. Five modes are defined:
Format_0 contains low resolution mode up to 640x480
Format_1 contains medium resolution modes: 800x600 and 1024x768
Format_2 contains mega pixel modes: 1280x960 and 1600x1200
Format_7 is the scalable image format. With this, you can change the image size, color coding and other parameters
In order to set or get the values of the parameters/features of the camera, the library functions will modify or read the register values.
The camera can work with or without DMA. We are greatful to Ian Peikon and Tim Hanson for contributing a section on IEEE1394 camera using DMA support
With the above background, we begin our discussion about the various functions, data structures and other miscellaneous features available in the dc1394_control.h file.
We would like to mention one important aspect of the dc1394_control.h file, which is that it lists out the values that can be set for the data speeds, frame rates, camera modes and image formats. All the values are in the form of enumerations to help you write readable code. For example, enumeration for speed indicates that the data speed can be set only as 100, 200, 400, 800, 1600 or 3200.
The dc1394_control.h also lists the features (brightness, hue, sharpness, saturation, etc.) supported for your camera.
4.1. Important Data Structures
The library provides some structures which are useful in storing camera and image related information. They have been declared in the dc1394_control.h file.
Structure | Use |
dc1394_camerainfo | Helps in accessing the information about the camera model, vendor, ccr_offset (used to access the registers). |
dc1394_cameracapture | Contains various parameters that are to be manipulated while the camera setup. It also declares a buffer of int type that will be used to store the grabbed frame. |
dc1394_misc_info | Contains the information about the ISO channel id, iso-channel speed, memory channel number. |
dc1394_feature_info | Contains the information about a particular feature (brightness, hue, gamma, white balance, etc.,) for example the availability and values for it. |
We will be largely concerned with the dc1394_cameracapture structure.
4.2. Types of functions
We have categorized the functions provided by the library into 6 types. (The categorization is purely done on our own for the ease of discussion). Each of these functions has been declared in dc1394_control.h. We suggest you to keep a copy of the file on hand while going through the subsequent section.
Get/Query Functions
Set Functions
Print Functions
Setup Functions
Format7 Functions
Release Functions
4.2.1. Get/Query Functions
These functions are used to get the value of various features of the camera, the information about the ISO channel, trigger mode, frame rate, format and mode. The functions contain get or query in their names.
For example,
int dc1394_get_gamma (raw1394handle_t handle, node_t node, unsigned int *gamma) |
Most of the get functions take a minimum of three parameters:
Both the raw1394handle_t and node_t nodes: these two together identify the camera
A pointer to obtain the value, for example, int * gamma
If we try to trace the flow of the function call, we can understand what actually happens:
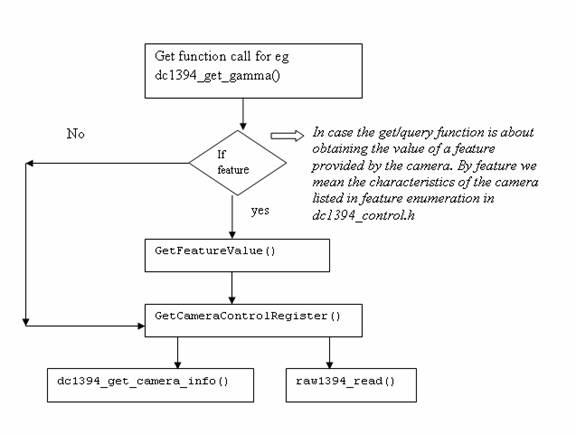
In case the get function you called is meant to retrieve the value of a camera feature (the value for the parameters listed in feature enumeration), that get function will call another get function (GetFeatureValue), which takes the enumeration value of the feature as input. For example, in the case of gamma value, the function passes 422 as the value (this value can be calculated from the enumeration given in the dc1394_control.h file).
Ultimately, the GetCameraControlRegister function, whose task is to get the value from the appropriate control registers, is called. This functions takes the offset value (octlet_t offset), which is the offset from the base register as the input to its call. The function prototype is declared in dc1394_internal.h.
GetCameraControlRegister (raw1394handle_t handle, nodeid_t node,
                         octlet_t offset, quadlet_t *value)
|
The above will store the final result in the value.
| Note on data types: |
|---|---|
The library makes use of typedefed data types octlet_t and quadlet_t very frequently . These are defined in dc1394_internal.h and stand for 8-byte and 4-byte data types. |
The GetCameraControlRegister function will in turn call dc1394_get_camera_info() to get the address of the base register:
camera->ccr_base = CONFIG_ROM_BASE + info->ccr_offset; |
Once the base register and the offset is known, raw1394_read() is called by GetCameraControlRegister to read the actual values.
Now the get function (dc1394_get_gamma) uses the value returned by the GetCameraControlRegister to modify the parameter gamma.
int dc1394_get_gamma (raw1394handle_t handle, node_t node , unsigned int *gamma ) |
In this way, the user obtains the value of the camera parameter he queried for.
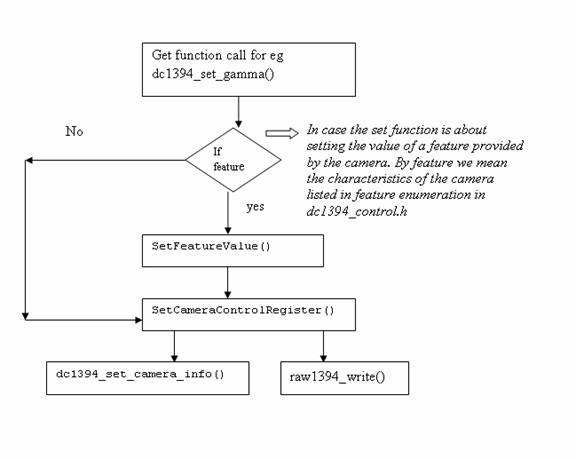
4.2.2. Set Functions
These functions are used to set the values of various camera features. There is a corresponding set function for almost each get function. You can recognize these functions by searching for set string.
For example,
dc1394_set_gamma (raw1394handle_t handle, nodeid_t node, int gamma) |
Like the get function, this function needs raw1394handle_t and nodeid_t for camera identification.
The other parameter, gamma, is the user-specified value for the gamma parameter.
The flow of the function call is quite helpful in understanding what is actually happening. The flow is exactly same as that of the get function. The only difference is this time all the intermediate functions are also set functions, and instead of raw1394_read(), it uses raw1394_write() to write the value of the camera parameter on to the registers.
4.2.3. Print Functions
There are three print functions available:
dc1394_print_camera_info: This function is used to print the values stored in the dc1394camera_info structure. The print function is usually called after dc1394_get_camera_info() to ensure that the dc1394camera_info structure is not NULL.
dc1394_print_feature: This function is used to print the value of any feature. It takes as an input the pointer to dc1394_feature_info structure.
dc1394_print_feature_set: This function is used to print the values of all features present in the camera. It takes as an input the pointer to dc1394_feature_set structure. The function call basically calls dc1394_print_feature repeatedly in a for loop.
4.2.4. Setup Functions
As the name suggests, these functions are used to prepare the camera to start grabbing the images. In order to setup the camera, some parameters must be passed to the function. The number and the type of parameters are specific to the setup function, but essentially three parameters must be passed in all the setup functions: raw1394handle_t, nodeid_t and the pointer to the dc1394_cameracapture structure (this is to provide the buffer for grabbed images and keep attributes, like height and width of frame).
As mentioned previously, raw1394handle_t and nodeid_t uniquely define the camera, while the pointer to dc1394_cameracapture provides the buffer for the image frame to be grabbed. It also stores information about the width and height of the frame which is useful at the time of image processing.
Other parameters that are passed are data speed, frame rate, image format, image mode and ISO channel number.
In case the camera uses DMA, the number of DMA buffers and drop frames is to be provided. In most applications you will want to set the number of DMA buffers relatively low(i.e. 1) this ensures that you are viewing frames in near real time. Drop frames is also important for real time as it causes the capture function to throw away the frames buffered in the DMA ring buffer except fot the last. We will discuss about DMA functions in the later part of this HowTo
The various setup functions are:
dc1394_dma_setup_capture
dc1394_setup_capture
dc1394_setup_format7_capture
dc1394_dma_setup_format7_capture
These setup functions have been defined in dc1394_capture.c.
You have a choice while passing the values for the parameters, like data-speed, format, mode, and channel. Instead of providing the value yourself, you may instruct the function to take the value from the camera. This can be done by passing QUERY_FROM_CAMERA in place of the actual value for that function parameter.
The basic flow of control is easy to understand:
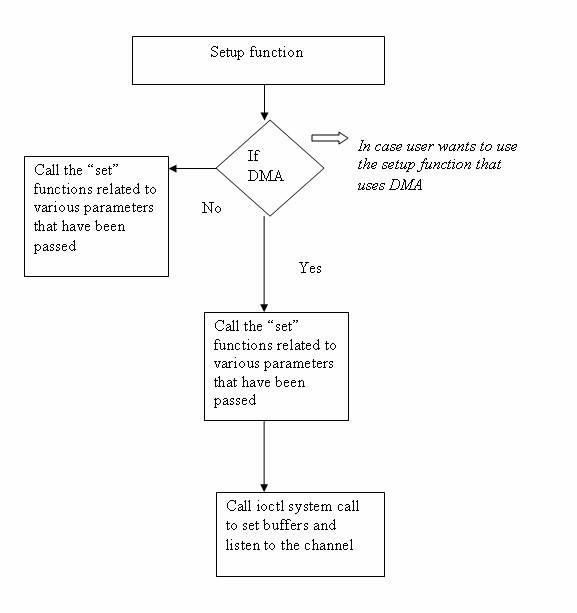
As shown in Figure 3, the Setup function in turn calls various set functions to set the parameter values to the camera registers. In the case of DMA setup, after the set functions have been called the ioctl system call is called to allocate memory for the DMA buffers and returns a pointer capture_buffer in user space.
The ioctl system calls will fail if the DMA is not setup correctly
The setup functions also allocate memory for the camera _capture buffer:
camera->capture_buffer=(int*)malloc(camera->quadlets_per_frame*4); |
4.2.5. Format7 Functions
These functions are used only if the camera is set for Format7. This format is preferred since this allows the user to define the size of the image to be captured according to his need. By default the size is 1024x768; you can set it to different dimensions, say 960x720.
All Format7 functions have format7 in their function names, and the functions have been defined in a separate file, dc1394_format7.c.
The setup function for Format7 has a minor difference from the normal setup since it also asks for the size of the frame, while you don't have to pass the format parameter as the setup function, as it is meant only for a particular format, for example Format7. The function call flow remains the same as discussed in the previous section.
The Format7 get functions are called query functions. The mechanism is different from the normal get/query functions: they don't call GetCameraControlRegister; instead, they call GetCameraFormat7Register().
The following flowchart will make the differences evident:
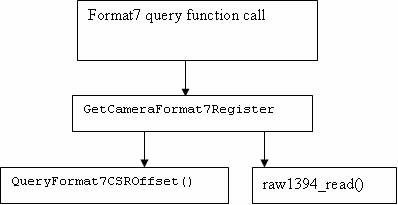
The Format7 query function will call GetCameraFormat7Register, which is supposed to read the values from the control and status registers of the camera. This function in turn will call the QueryFormat and CSROffset to know the offset for the particular information that has been queried. After getting the offset, raw1394_read is used to actually read the values.
The Format7 set functions also follow the same logic with the obvious difference that the reading functions are replaced by writing functions, for example, SetCameraFormat7Register and raw1394_write().
4.2.6. Release Functions
These are the final set of functions identified by us. The basic job of these functions is to release the memory allocated to the capture buffer by the setup routine. This is essential to save the system from memory leaks.
These functions are defined in dc1394_capture.c:
dc1394_release_camera() |
This function in turn calls free (camera -> capture_buffer), which frees the memory.
Similarly, the release function is available for DMA setup.
4.3. Coriander: A GUI for the libdc1394 library
Coriander helps in easy handling of the IEEE1394 cameras. It uses the above discussed functions and libraries and provides a GUI for them. The main advantage of Coriander is that it saves time that is normally wasted in camera setup. Also, Coriander shows only those features and attributes that are present on the camera and hence you can judge how useful the camera will be for your application development. The most important feature of Coriander is its ability to display the captured image at run-time.
Coriander also allows the user to convert a BGGR image to RGB. We will discuss the meaning of these types of images in detail in later sections. Some files that can be useful in understanding the functionality of Coriander are:
thread_iso.c
Camera.c
main.c
The Coriander homepage contains an excellent user manual which can be useful in case of any difficulty: http://damien.douxchamps.net/ieee1394/coriander/manual.php.
Our use of Coriander was limited only to checking that the camera was working properly and confirming the focus was correct. We will give some more usage information for Coriander in later sections.
4.4. Example: How to grab image from the IEEE1394 camera
In this section we will demonstrate how to write a small program to grab an image from the camera. We have taken the program (grab_gray_image.c) given in the examples in the library tar file. We have removed some lines to increase the readability of the code. We have provided the explanation for this code below. In order to provide you with a clear picture of which section of the code does what, we grouped the code lines together by task below.
#include <stdio.h> #include <libraw1394/raw1394.h> #include <libdc1394/dc1394_control.h> #include <stdlib.h> |

- Include the header files, which means include:
libraw1394/raw1394.h
libdc1394/dc1394_control.h
These are necessary in order to access functions of the library.

- Declare three variables of the following data types:
dc1394_cameracapture
raw1394handle_t
nodeid_t *
The raw1394handle_t and nodeid_t * are required to uniquely identify the camera. Moreover, raw1394handle_t is used to hold the handle that is created for the OHCI-compliant host card.

- Open ohci and assign a handle to it.
This is done by:
handle=dc1394_create_handle(0)
Where handle is of the raw1394handle_ttype> type. The parameter 0 refers to the position of the camera on host card (there may be more than one slot on the host card; 0 means that the camera is on the first slot ).
If the wrong number is passed, the handle will not be created.

- Get camera nodes:
There can be more than one camera node, since IEEE1394 supports multiple devices on a single port. But for our discussion we will assume that only a single camera is present. Here is how to get nodes:
int numNodes = raw1394_get_nodecount(raw1394handle_t handle)
camera_nodes=dc1394_getcamera_nodes(handle,&numCameras,1)
If the number of cameras returned is numCameras <1, this means no camera has been detected.
1 in the function signifies that a printed description of the camera node found will be shown on the console.

- Check the condition of camera_nodes[0]==numNodes -1. It must be false. The explanation for this is outside the scope of this document.

- Call the setup function and pass the various parameters. For example, let us examine the setup function of the above example:
Our suggestion is that the various parameters should be first queried from the camera and then passed. This is helpful in a successful setup since often the user does not know actual values of the various parameters that have to be passed in the setup function call, and ends up passing the wrong values. In such situations the setup is not done correctly and the camera doesn't get initialized.
We are listing the appropriate get functions that should be called first in order to obtain the correct values of the setup parameters:
dc1394_get_iso_channel_and_speed(handle,camera_nodes[0], &channel,&speed); /* to get the channel and the data speed */
dc1394_get_video_format(handle,camera_nodes[0],&format); /*to get the format */
dc1394_get_video_framerate(handle,camera_nodes[0],&framerate); /* to get the framerate*/
dc1394_get_video_mode(handle,camera_nodes[0],&mode); /* to get the mode */
So the above dc1394_setup_capture function call will look like this:

- Setting the trigger mode. This is generally not required. This is just like brightness:
dc1394_set_trigger_mode(handle,camera.node,TRIGGER_MODE_0) sets the trigger mode to 0.

- Have the camera start sending the data to the user. This is done by starting the ISO transmission. The following function is used:
dc1394_start_iso_transmission(handle,camera.node)

- Capture one frame by calling the function:
dc1394_single_capture(handle,&camera)
Where camera is a pointer to the structure dc1394_cameracapture. This function will grab the image and store it in the buffer (capture_buffer) provided by the structure.
In order to capture more than one frame use a for loop and place the function inside it:

- After the image has been grabbed, stop the data transmission by calling the following function:
dc1394_stop_iso_transmission(handle,camera.node)
- (11)
- Add a PGM file header to the captured buffer to see the image using gimp.
- (12)
- Use fwrite to save the captured image, by writing the buffer (camera.capture_buffer) to a file. The other parameters like height and width of the image can be extracted from the same structure: camera.frame_width, camera.frame_height.
- (13)
- Close the camera. This step is necessary to prevent a memory leak:
In order to compile the program, use: gcc -o grabImage grabImage.c -ldc1394_control -lraw1394, where grabImage.c is your program.
     dc1394_setup_capture(

/* handle and camera_nodes[0] uniquely identifies the camera */
     handle,
    camera_nodes[0],
    0, /* channel */

/*format of the Image */
    FORMAT_VGA_NONCOMPRESSED, MODE_640x480_MONO, /* mode of the image */
    SPEED_400, /* data speed */
    FRAMERATE_7_5, /*Frame rate */
    &camera /*dc1394_cameracapture type pointer *./
    )!=DC1394_SUCCESS)
|
     dc1394_setup_capture(

/* handle and camera_nodes[0] uniquely identifies the camera */
     handle,
     camera_nodes[0],

   /*we pass the variables instead of actual values */
     channel ,
     format,
     mode,
     speed,
     framerate,
     &camera /*dc1394_cameracapture type pointer *./
     )!=DC1394_SUCCESS)
|
| Note on nodes: |
|---|---|
We have passed camera.node which indicates that the dc1394_cameracapture structure is being used and only the particular node for which the camera has been setup is being referred to, but we can also use camera_nodes[0]. |
for( i=0;i<100 ;i++)/* to capture 100 images*/ dc1394_single_capture(handle,&camera) |
dc1394_release_camera(handle,&camera); dc1394_destroy_handle(handle); |
We hope that after going through this algorithmic way explanation you can comfortably understand the example code.
If we used the Format7 image format, we would have to change only the setup_capture function. Let us look at the setup function:
      dc1394_setup_format7_capture(
  /* handle and camera_nodes[0] uniquely identifies the camera */
            handle,
            camera_nodes[0],
            channel, /* channel */
            mode , /*mode */
            bytes_per_packet ,
            left ,/*area of interest start column */
            right, /*area of interest start row */
            width,/* area of interest width */
            height /* area of interest height */
           &camera /* dc1394_cameracapture type pointer *./
            )!=DC1394_SUCCESS)
|
dc1394_get_iso_channel_and_speed(handle,camera_nodes[0], &channel,&speed) /* to get the channel and the data speed */
dc1394_get_video_mode(handle,camera_nodes[0] &mode); /* to get the mode */
dc1394_query_format7_byte_per_packet(handle, camera_nodes[0], mode ,&bytes_per_packet); /* to get the bytes per packet which depends on the mode*/
The value of left, top can be set to QUERY_FROM_CAMERA, or can be specified directly by the user.
The value of the width and height depends on the size of frame the user wants, for example, if one wants 960x720 then pass 960 as width and 720 as height.
4.5. Example: How to grab image from the IEEE1394 camera using DMA
This section has been contributed by Ian Peikon <idp2@duke.edu>and Tim Hanson <tim@hardcarve.com> We will now present an example of how to grab a frame by the camera using DMA calls. The example is simple to understand as the logic remains the same as the previous example. We will later compare the function calls used in the previous example (without dma) and this example (with dma) for better understanding.
#include <stdio.h>
#include <libraw1394/raw1394.h>
#include <libdc1394/dc1394_control.h>
#include <stdlib.h>
#include <iostream>
#define IMAGE_FILE_NAME "Image.pgm"
using namespace std;

int main(int arc, char *argv[]){
        FILE * imagefile;
        dc1394_cameracapture camera;
        int numNodes;
        int numCameras;
        raw1394handle_t handle;
        nodeid_t * camera_nodes;
        unsigned int channel, speed, format, framerate, mode;

        /*Step 1: Open ohci and assign a handle to it.*/
	/*=======================================================*/
	handle = dc1394_create_handle(0);
        if(handle==NULL){
                fprintf(stderr, "Unable to acquire a handle. \n\n");
        }
        else{
		 cout <<"dma1394: Handle aquired successfully-" <<handle<<"\n";
        }

/*Step 2: Get the camera nodes and describe them as we find them.*/
	/*=========================================================================*/
	numNodes = raw1394_get_nodecount(handle);
        camera_nodes = dc1394_get_camera_nodes(handle, &numCameras, 1);
        fflush(stdout);
        if (numCameras<1){
                fprintf(stderr, "No cameras found :( \n");
                dc1394_destroy_handle(handle);
                return -1;
        }
        else{
                cout<<"dma1394:"<< numCameras<<" cameras found. \n";
        }
        printf("dma1394: Working with the first camera on the bus.\n");
        if(camera_nodes[0] == numNodes-1){
                fprintf(stderr, "\n" "dma1394: Sorry, your camera is the highest numbered node.\n");
                dc1394_destroy_handle(handle);
                dc1394_free_camera_nodes(camera_nodes);
                return -1;
        }

/*Step 3: Setup Capture*/
	/*=====================================================================*/
	/*Using camera functions to get the params by querying them*/
	cout<<"INFO FOR DEBUG: \n"
                        "num_dma_buffers: "<< camera.num_dma_buffers<<"\n";
        dc1394_get_iso_channel_and_speed(handle, camera_nodes[0], &channel, &speed); /*get channel and speed*/
	dc1394_get_video_format(handle, camera_nodes[0], &format); /*get format*/
	dc1394_get_video_framerate(handle, camera_nodes[0], &framerate); /*get framerate*/
	dc1394_get_video_mode(handle, camera_nodes[0], &mode); /*get mode*/
	cout<<"dc1394: Got parameters from the camera.\n"
                "=======================================\n"
                "Channel: "<< channel<< " \n"
                "Speed: " <<speed <<" \n"
                "Format: "<< format <<" \n"
                "Framerate: " <<framerate<< "\n"
                "Mode: "<< mode <<"\n";
        camera.num_dma_buffers = 8; /* set the dma buffers */
        camera.drop_frames = 1; /* set the number of drop frames */
        camera.dma_device_file = NULL;
        if(dc1394_dma_setup_capture(handle, camera_nodes[0], channel, format, mode, speed, framerate, camera.num_dma_buffers, camera.drop_frames, camera.dma_device_file, &camera) !=DC1394_SUCCESS){
                fprintf(stderr, "dma1394: Unable to setup camera.\n"
                                        "Check line %d of %s to ensure that the options set are supported by your camera.\n", __LINE__, __FILE__);
                dc1394_destroy_handle(handle);
                dc1394_free_camera_nodes(camera_nodes);
                return -1;
        }
        else{
                printf("dma1394: Capture has been setup.\n");
        }
        dc1394_free_camera_nodes(camera_nodes);

        //Set Trigger Mode -- Generally not required thus I will comment it out.
	/*if(dc1394_set_trigger_mode(handle, camera.node, TRIGGER_MODE_0) != DC1394_SUCCESS){
                fprintf(stderr, "dma1394: Unable to set the camera trigger mode. Refer to line %d in %s.\n", __LINE__, __FILE__);
                dc1394_release_camera(handle, &camera);
                dc1394_destroy_handle(handle);
        }
        else{
                printf("dma1394: Successfully set trigger mode.\n");
        }*/

        /*Step 4: Start sending data */
	/*=======================================================*/
	if(dc1394_start_iso_transmission(handle, camera.node) != DC1394_SUCCESS){
                fprintf(stderr, "dma1394: Unable to start the data transmission.\n");
                dc1394_dma_done_with_buffer(&camera);
				dc1394_dma_release_camera(handle, &camera);
                dc1394_destroy_handle(handle);
                return -1;
        }
        else{
                printf("dma1394: Success.  Data Transmission started.\n");
        }

        /*Step 5: Capture Something...Anything...PLEASE*/
	/*===============================================================*/
	if(dc1394_dma_single_capture(&camera) != DC1394_SUCCESS){
                fprintf(stderr, "dma1394; DAIM, can't capture a single frame.\n");
				dc1394_dma_done_with_buffer(&camera); /*important step */
                dc1394_dma_release_camera(handle, &camera);
                dc1394_destroy_handle(handle);
                return -1;
        }
        else{
                printf("dma1394: GREAT SUCCESS! Captured a single frame.\n");
        }

        /*Step 6: Stop sending data*/
	/*==================================================*/
	if(dc1394_dma_unlisten(handle, &camera) != DC1394_SUCCESS){
        		fprintf(stderr, "Can't unlisten iso channel! \n");
        }
        else{
                printf("dma1394: DMA unlistened. \n");
        }

	if(dc1394_stop_iso_transmission(handle, camera.node) != DC1394_SUCCESS){
                fprintf(stderr, " Can't stop the camera!! \n");
        }
        else{
                printf("dma1394: Data transmission terminated. \n");
        }

        /*Step 7: Save our image*/
	/*===============================================================*/
	imagefile=fopen(IMAGE_FILE_NAME, "w");
        if(imagefile==NULL){
                perror("dma1394: Can't create' "IMAGE_FILE_NAME" ' ");
                dc1394_dma_done_with_buffer(&camera);
				dc1394_dma_release_camera(handle, &camera);
                dc1394_destroy_handle(handle);
                return -1;
        }
        else{
                cout<<"dma1394: Saved image in "<<IMAGE_FILE_NAME<<".\n";
        }
         /*Add pgm file header*/
	fprintf(imagefile, "P5\n%u %u 255\n", camera.frame_width, camera.frame_height);

		/*write to file*/
	fwrite((const char *)camera.capture_buffer, 1, camera.frame_height*camera.frame_width, imagefile);
        fclose(imagefile);
        printf("dma1394: wrote: " IMAGE_FILE_NAME "\n");

        /*Step 8: Close camera*/
	/*=============================================================*/
	dc1394_dma_done_with_buffer(&camera);
	dc1394_dma_release_camera(handle, &camera);
        dc1394_destroy_handle(handle);
        printf("dma1394: Camera released.  Exiting. \n");

        //Step END
	return 0;

}
|
Just like the previous example (Section 4.4) the program includes the necessary header files(libraw1394/raw1394.h and libdc1394/dc1394_control.h) and then declare the three variables of the following data type
dc1394_cameracapture
raw1394handle_t
nodeid_t *
- Open ohci and assign handle to it using the function dc1394_create_handle(0)
- Get the camera nodes using the function dc1394_get_camera_nodes
- Find out various parameters need to be passed during the camera setup. This is done by querying the camera using the following functions
- dc1394_get_iso_channel_and_speed(): To get the channel and speed information
- dc1394_get_video_format(): To get the camera format
- dc1394_get_video_framerate(): To get the framerate information
- dc1394_get_video_mode(): To get the camera mode
Once the values of the parameter have been obtained (framerate,format,mode,channel,speed etc), they are passed in dc1394_dma_setup_capture which then sets up the camera and enables it for capturing video. For DMA you must pass the number of dma buffers and drop frames parameter.
- After the camera is set, dc1394_start_iso_transmission()is called. This function starts data transactions from the camera to the bus.
- Now capture one frame using dc1394_dma_single_capture(). This function will capture a frame into the dma buffer
After the frame has been grabbed release the dma buffer using dc1394_dma_done_with_buffer(). This is required so that the memory can be reused. It is imperative that dc1394_dma_done_with_buffer() always follows a dma_capture function call
So in order to capture more than one frame the code will befor( i=0;i<100 ;i++)/* to capture 100 images*/ { dc1394_dma_single_capture(&camera); dc1394_dma_done_with_buffer(&camera); } - Stop listening to the iso channel by calling dc1394_dma_unlisten()
Terminate the data transmission by calling dc1394_stop_iso_transmission()
- Save the image in a file and add a PGM header for viewing using gimp.
- Finally call dc1394_release_camerato release the camera
If DMA is not setup correctly you will get the following error message:
VIDEO1394_IOC_LISTEN_CHANNEL ioctl failed
There are various reasons for this error which will be further explained in the Problems section (Section 4.7)
Thus we can see that the image capture using DMA is not much different from non DMA method. We have compared the functions used in two approaches in the following table.
Non DMA steps | DMA steps | Comments |
dc1394_create_handle | dc1394_create_handle | Create handle |
dc1394_get_camera_nodes | dc1394_get_camera_nodes | Get camera nodes |
dc1394_setup_capture | dc1394_dma_setup_capture | Call setup functions to set various parameters of camera |
dc1394_start_iso_transmission | dc1394_start_iso_transmission | Start sending the data from camera to the bus |
dc1394_single_capture | dc1394_dma_single_capture, dc1394_dma_done_with_buffer | Capture one frame |
dc1394_stop_iso_transmission | dc1394_dma_unlisten, dc1394_stop_iso_transmission | Stop sending the data from camera to the bus |
dc1394_release_camera, dc1394_destroy_handle | dc1394_dma_done_with_buffer, dc1394_dma_release_camera, dc1394_destroy_handle | Close the camera |
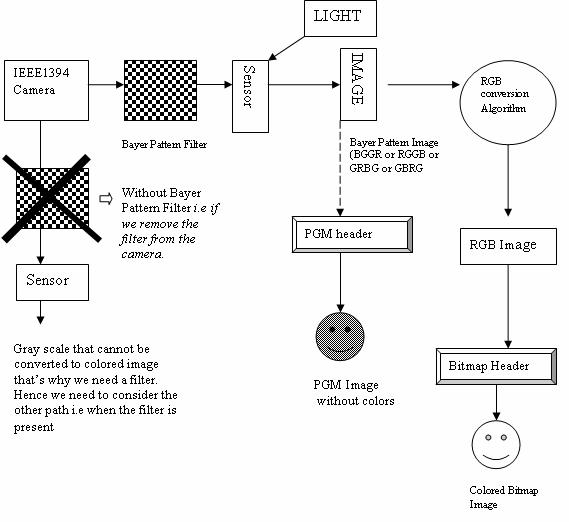
4.6. How to get color images: Bayer Pattern Concepts
The image grabbed by the sample code in the previous section is not colored (we have intentionally used the words "not colored," since the image is not gray-scale either). It is actually a Bayer Pattern. We will give an overview of Bayer Patterns and how they are used to get a colored image in this section.
Digital cameras use a solid-state device called an image sensor. These fingernail-sized silicon chips contain millions of photosensitive diodes called photosites. When you take a picture with a digital camera, the intensity of light hitting each photo site on the sensor is recorded as a signal. Depending on the camera, either 12 or 14 bits of data are recorded. At 12 bits, the camera can record 4,096 levels of brightness. At 14 bits, the camera can record 16,384 levels of brightness. This is referred to as bit depth. The higher the bit depth, the finer is the detail, the smoother the transition between tones, and the higher the dynamic range (the ability of the camera to hold detail in both highlighted and shadowed areas). But at capture, digital images are grayscale, not color. To record color information, each pixel on the sensor is covered with a red, green, or blue filter, with the colors alternating. A common arrangement of color filters is the Bayer Pattern array that alternates colors, but that also uses twice as many green filters as red and blue. Twice as many green filters are used because our eyes are more sensitive to green. This pattern, or sequence, of filters can vary, but the widely adopted Bayer Pattern, which was invented at Kodak, is a repeating 2x2 arrangement. Each pixel has been made sensitive only to one color (one spectral band).
A Typical Bayer Pattern will look like this:
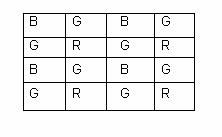
The tile or square (pixel) labeled B means this particular tile is sensitive only to Blue light, and so on.
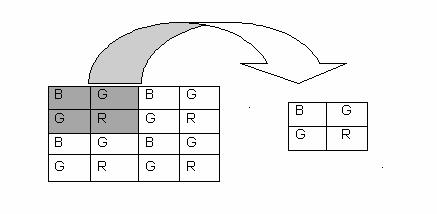
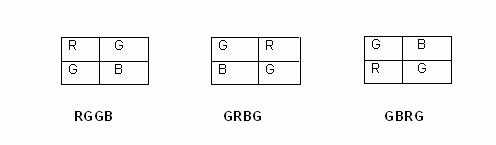
The Bayer Patterns may be classified into 4 types, depending on how we have arranged the colors. The naming of the Bayer Pattern is done by taking a 2x2 matrix from the top most corner of the pattern and the colors being read in (0,0),(0,1),(1,0),(1,1) order. So for the above Bayer Pattern, if we take the 2x2 matrix as:
The pattern is therefore known as BGGR
The other possible patterns are:
The image we obtained in the previous example was a Bayer Pattern image also known as a RAW image. This was stored in camera.capture_buffer. In order to view what we have captured we convert this RAW image to .PGM by adding a header (look at the explanation in Section 4.4).
In order to get a colored image, the Bayer Pattern image is converted to a RGB image. A RGB image is an enhanced version of the Bayer Pattern image; we try to find the value of the two missing colors at each pixel (remember that each pixel of the sensor is covered by Bayer Pattern filter so we get a single color at any pixel by default). This is done by using different algorithms like Nearest Neighbor, Edge Sense, and so on:
where the shaded values are to be calculated by the algorithm. Subscript denotes the tile on the Bayer Pattern to which the value of R, G, and B belongs. Note that the image size will become 3 times the Bayer Pattern. In order to view the RGB image we convert it to a Bit Map, or .BMP image, by adding a bitmap header.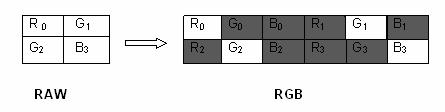
To get a clear picture of what's happening, we have provided the following diagram:
Let's understand how the RAW to RGB conversion algorithms work. We will look into the Nearest Neighbor algorithm in detail. Other Algorithms are thoroughly explained at the following web link: http://www-ise.stanford.edu/~tingchen/main.htm.
Most of these algorithms make use of some kind of interpolations.
4.6.1. Nearest Neighbor Algorithm
In this interpolation method, each interpolated output pixel is assigned the value of the nearest pixel in the input image. The nearest neighbor can be any one of the upper, lower, left or right pixels.
An example will make the logic clear. We try to find the G values for the R, B tiles for a 3x3 block (shown as shaded region. The blank squares either bear R value or B value. We have not shown them just to make the figure easy to understand). Here we assume the left neighboring pixel value is used to fill the missing ones.
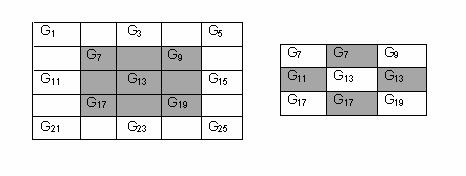
The table on the left shows the G values for the Bayer Pattern image. In order to find out the missing G values for the other squares that originally contains only R or B we use the following approach:
Find the nearest G value square and copy the G value of that square onto the R (B) square. This has been illustrated in the above figure. The square next to G7 had a value of either R or B. So to get G8 (a G value for square 8) we copied the G value of square 7, since it was the nearest so G8 = G7. Similarly we filled the other non G value squares.
The same logic is applied when finding R and B values for the green squares.
4.6.2. Example program to understand how the colored image is grabbed using IEEE1394 Camera
Now that we have presented the basic concept of the RAW, RGB and the conversion algorithm, we feel that you can understand an example program that gives us a colored image.
We have chosen the format as Format7 because the camera we used responds to this format only. We will make use of another example code which provides the implementation of the algorithms. The program is conversions.cpp, in the grabdma folder, available for download at http://www.ptgrey.com/support/kb/data/grabdma.tgz.
To run the code, make sure that you have the following files:
conversions.h
conversions.cpp
grabcolor.cpp - also from the grabdma folder. We have modified the code according to our requirements and removed some of the lines. Since most of the code is same as the previously discussed code, we have explained only the portions that are different. These portions have been emphasized.
#include <stdio.h>
#include <libraw1394/raw1394.h>
#include <libdc1394/dc1394_control.h>
#include <stdlib.h>
#include <onversions.h>

#define IMAGE "Image.rgb"

int main(int argc, char *argv[])
{
  FILE* imagefile;
  dc1394_cameracapture camera;
  int numNodes;
  int numCameras;
  raw1394handle_t handle;
  nodeid_t * camera_nodes;
  int channel,speed,mode,bytes_per_packet;

   /* Open ohci and asign handle to it */

    handle = dc1394_create_handle(0);
  if (handle==NULL)
  {
    fprintf( stderr, "Unable to aquire a raw1394 handle\n\n"
       "Please check \n"
         " - if the kernel modules `ieee1394',`raw1394' and `ohci1394' are loaded \n"
         " - if you have read/write access to /dev/raw1394\n\n");
exit(1);
  }

  /* get the camera nodes and describe them as we find them */

  numNodes = raw1394_get_nodecount(handle);
  camera_nodes = dc1394_get_camera_nodes(handle,&numCameras,1);
  fflush(stdout);
  if (numCameras<1)
  {
    fprintf( stderr, "no cameras found :(\n");
    dc1394_destroy_handle(handle);
    exit(1);
  }
  printf("working with the first camera on the bus\n");

  if( camera_nodes[0] == numNodes-1)
  {
    fprintf( stderr, "\n"
           "Sorry, your camera is the highest numbered node\n");
    dc1394_destroy_handle(handle);
    dc1394_free_camera_nodes(camera_nodes);
    exit( 1);
  }

  /*obtain the values of the parameter from the camera */

dc1394_get_video_mode(handle,camera_nodes[0],(unsigned int *)&mode);

dc1394_get_iso_channel_and_speed(handle,camera_nodes[0],
(unsigned int *)&channel, (unsigned int *)&speed);

dc1394_query_format7_byte_per_packet(handle,camera_nodes[0],(unsigned)
mode,&bytes_per_packet);

  /*setup capture */

if (dc1394_setup_format7_capture(handle,
           camera_nodes[0],
         channel , /* channel */
         mode,
         speed,
         bytes_per_packet,
         0,
         0,
         960,
         720,
         &camera)!=DC1394_SUCCESS)
  {
    fprintf( stderr,"unable to setup camera-\n"
         "check line %d of %s to make sure\n"
         "that the video mode,framerate and format are\n"
         "supported by your camera\n",
         __LINE__,__FILE__);
    dc1394_release_camera(handle,&camera);
    dc1394_destroy_handle(handle);
    dc1394_free_camera_nodes(camera_nodes);
    exit(1);
  }
  dc1394_free_camera_nodes(camera_nodes);

  /* have the camera start sending us data*/

  if (dc1394_start_iso_transmission(handle,camera.node)
      !=DC1394_SUCCESS)
  {
    fprintf( stderr, "unable to start camera iso transmission\n");
    dc1394_release_camera(handle,&camera);
    dc1394_destroy_handle(handle);
    exit(1);
  }

  /* capture one frame */

  if (dc1394_single_capture(handle,&camera)!=DC1394_SUCCESS)
  {
    fprintf( stderr, "unable to capture a frame\n");
    dc1394_release_camera(handle,&camera);
    dc1394_destroy_handle(handle);
    exit(1);
  }

  /*query the camera to determine the Bayer pattern*/

quadlet_t qValue;
   GetCameraControlRegister( handle,
              Camera_nodes[0],
              0x1040,/* Bayer Tile Mapping register */
              &qValue );

   bayer_pattern_t pattern = BAYER_PATTERN_BGGR;
   switch( qValue )
   {
      case 0x42474752:/* BGGR */
       pattern = BAYER_PATTERN_BGGR;
       break;
      case 0x47524247:/* GRBG */
       pattern = BAYER_PATTERN_GRBG;
       break;
      case 0x52474742: /* RGGB */
       pattern = BAYER_PATTERN_RGGB;
       break;
      case 0x47425247:/* GBRG */
       pattern = BAYER_PATTERN_GBRG;
       break;
      case 0x59595959:/* YYYY = BW */
       fprintf( stderr, "Camera is black and white\n" );
       cleanup();
       return 1;
      default:
      fprintf(stderr,
          "Camera BAYER_TILE_MAPPING register has an unexpected value:\n"
          "\t0x%x\n", qValue );

      return 1;
   }

   int bufferSize = camera.frame_width*camera.frame_height;

   /* assign a buffer of size three time the original image */

   unsigned char* rgbBuffer = new unsigned char[3 * bufferSize];

   unsigned char* src = (unsigned char*)camera.capture_buffer;

   unsigned char* captureBuffer=
            (unsigned char*)camera.capture_buffer;
   for ( int i = 0; i < bufferSize; i++ )
   {
       src[i] = captureBuffer[ i * bytesPerPixel ];
   }

   /* convert to color image */

   BayerNearestNeighbor (src,
             rgbBuffer,
             camera.frame_width,
             camera.frame_height,
             pattern );


   /* Stop data transmission */

  if (dc1394_stop_iso_transmission(handle,camera.node)!=DC1394_SUCCESS)
  {
  printf("couldn't stop the camera?\n");
  }

  /* save image as 'Image.rgb' without adding any pgm header */

  printf( "Saving the image...\n" );
  imagefile = fopen( IMAGE, "w" );

  fwrite( rgbBuffer, 3,
         bufferSize, imagefile );

  fclose( imagefile );

  /* Close camera */

  dc1394_release_camera(handle,&camera);
  dc1394_destroy_handle(handle);
  return 0;
}
|
As we have already discussed the use of GetCameraControlRegister, you can understand that it has been used to find out the value contained at 0x1040. Libdc1394 does not provide any function to query this address, so we explicitly used this call to get the value.
It is important to understand the utility of the above function call. Refer to our discussion about the Bayer Pattern filters in the previous section. We know that the pattern can be BGGR, RGGB, GRBG, and GRBG. The algorithm that we use for converting the Bayer Pattern to RGB requires to know about the type of pattern the camera filter has got so that it can carry out some initialization (refer to conversions.cpp for details). The fourth parameter in the function call:
   BayerNearestNeighbor (src,
             rgbBuffer,
             camera.frame_width,
             camera.frame_height,
             pattern )
|
refers to this value.
BayerNearestNeighbor is the function call for the interpolation algorithm we discussed in the last section. This is implemented in conversions.cpp.
Having understood this, we move on to the switch-cases. The value that is obtained for the Bayer Pattern (qvalue) is in the hex form which needs to be decoded for setting the value of the variable pattern.
The case statements indicate the various hex values relating to the Bayer Pattern that can be returned by the various cameras. The intimidating values are actually quite easy to decode. Here's the trick:
The hex code for various colors is as follows:
42h -> B
47h -> G
52h -> R
Now if the qvalue contains 0x42474752, it means: B (42h) G (47h) G (47h) R (52h) or BGGR. We can therefore decode all the case statements similarly.
Finally, we need to declare another image buffer that will contain the RGB image. Remember that the size of the RGB is 3 times the size of the Bayer Pattern image. rgbbuffer is therefore assigned 3 times the buffer size (camera.capture_buffer). This buffer (rgbbuffer) will be passed as the destination buffer (the second parameter in BayerNearestNeighbor).
After the buffer has been filled with the RGB values we write it in the file image.rgb.
In order to view this image using gimp, we need to append a bitmap header. The method we employed was as follows:
Save the RGB image buffer in a file, say, image.rgb.
Make a bitmap header and save it in a separate file, bmpheader. Refer to http://www.fortunecity.com/skyscraper/windows/364/bmpffrmt.html for header details.
cat bmpheader image.rgb > bmpfile
Open bmpfile using gimp.
In order to run the program, use the following steps:
g++ -c conversions.cpp g++ -o grabcolor conversions.o grabcolor.cpp -lraw1394 -ldc1394_control |
| Note on available algorithms: |
|---|---|
There are many algorithms that are available in conversions.cpp, so depending upon the requirements, you can call the necessary functions. |
The Coriander application is useful in finding out how the RGB image will look after undergoing different conversion algorithms. For example, it provides the choice between Nearest Neighbor, Edge Sense and Down Sample conversion algorithms. The difference can be observed on a mouse click.
4.7. Common Problems Faced While Working With IEEE1394 Cameras
We now look at some of the common problems faced while working with the camera, however we have only listed those problems which we faced. These problems are likely to be faced by anyone who uses the library and the camera. Some of the problems were solved with a proper reasoning but some were just hit-and-miss attempts. The problems and their solutions are listed below.
Problem #1. After the installation of the library and the modules the camera did not respond
Solution: We disconnected the camera and connected it again. May be this has to be repeated multiple times. We could not figure out an appropriate reason for this but it works.
Problem #2. Program is not compiling
Solution: If one forgets to link the executable with raw1394 and dc1394_control the program won't compile. The correct way is:
gcc -o xx xx.c -lraw1394 -ldc1394_control /*for C files*/
g++ -o xx xx.cpp -lraw1394 -ldc1394_control /* for Cpp files */
Problem #3. Compilation failed, giving the error: libdc1394_control.so.13: cannot open the shared object file.
Solution: Check for the environment variable LD_LIBRARY_PATH. This should contain the path of the shares library. On our system the path was /usr/local/lib. The path must be set accordingly.
Problem #4. Program hangs when executed.
Solution: This primarily happens if the values of parameters that are passed to the setup function are not supported by the camera. For e.g. setting the mode mode_640x480_MONO16 when it is not supported. Our suggestion is that one should always query for the values and then pass them to the function (as explained in the example code, located in Section 4.4).
Problem #5. IDEO1394_IOC_LISTEN_CHANNEL ioctl failed error message being displayed.
Solution: (contributed by Ian and Tim). There are various reasons for this error message. Type dmesg in the command prompt to gain a better understanding of the problem. Here is a list of problem we ran into [1]
Problem #6. Used CTRL+C to terminate the image grabbing program, but the next time the program is run, it just hangs.
Solution: The error usually occurs because the camera functions like a pipe and experiences a broken pipe situation if terminated without flushing the memory channels. The trick is to disconnect the camera and connect it again. One can also try debugging the problem by reinstalling the ohci1394, video1394, raw1394, video1394 modules, which works occasionally.
Problem #7. Every parameter is okay and the installation is also fine, but even then, when the program is executed the camera is still not detected.
Solution: This is a strange problem which we also face frequently. The solution is based on trial and error, but it always works:
Disconnect the camera first and then reconnect it.
Now run Coriander (that's why we suggest that you install Coriander before you start working with the camera).
Make all the necessary adjustments; for example, select the mode of the camera, the frame size, and so forth.
Close Coriander.
Execute your program.
Note on first step above: The first step is critical since we experienced an error message from Coriander about not finding the camera if we did not disconnect and reconnect the camera before running Coriander.
5. References
http://kauri.auck.irl.cri.nz/~johanns/libdc1394/libdc1394_FAQ.html, libdc1394 FAQ by Johann Schoonees.
Point Grey Dragonfly Camera Technical Reference Manual, Version 2.1.2.1.3
Raw Capture: A Second Chance to Get it Right, by Charlotte K. Lowrie, 2005-09-01
http://www.fortunecity.com/skyscraper/windows/364/bmpffrmt.html
A. Appendix A
A.1. License
This document, Libdc1394 Library support for IEEE 1394 Cameras HOWTO, is copyrighted © 2005 by Rohit Agarwal & Vikram B. Permission is granted to copy, distribute and/or modify this document under the terms of the GNU Free Documentation License, Version 1.2 or any later version published by the Free Software Foundation; with no Invariant Sections, with no Front-Cover Texts, and with no Back-Cover Texts. A copy of the license is available at http://www.gnu.org/copyleft/fdl.html.
A.2. Disclaimer
Although we have tried to do our best to bring out this HOWTO in a good form, we are not responsible for any damage due to the actions taken based upon the information contained in this document. It is impossible to test things under all the configurations, so probably some of the hints given in this document may be incorrect and may not work on your system. In case you find anything wrong, let us know it first. We will rewrite the document as soon as possible. This document is provided "as is". We put great effort into writing it as accurately as we could, but you are using the information contained herein at your own risk. In no event shall we be liable for any damages resulting from the use of this work.
A.3. About Authors
Rohit Agarwal and Vikram B are pursuing their Masters Degrees in IT from the International Institute of Information Technology, Bangalore, India.
They can be contacted at:
rohdimp_24@rediffmail.com <Rohit>
vickys_box@rediffmail.com <Vikram>
A.4. Dedications
We are grateful to all our friends for their support. We would specially like to thank Chinmay Narayan our batch mate for his valuable advices. We would like to dedicate this document to our Professor, Mr. S. Nagrajan, for he is the one who motivated us to contribute to the open source community.